Crock Pot For the Win!

Let’s first address this: yes, it has been FOREVER since I’ve posted a blog. Y’all know how it goes with me… πŸ™‚

So as we settle back into a new year of school, things start to get a little crazy busy. I have been “lazy” when it comes to cooking. I’m so exhausted by the end of the day I’m tempted to just say “hey, let’s order pizza!…. AGAIN!”

Time to break out the crock pot meals! My crock pot meals needed updating, so I hope y’all enjoy these updated recipes!!

***RAVIOLI***
(I must INSIST that you use Member’s Mark Seviroli Four Cheese Ravioli. Trust me, it’s the best option for the meal! I get it from Sam’s Club, only $9 for a 64oz bag)
68371281_10218761286879430_1804557958550388736_n

Ingredients:
1 bag of frozen ravioli
2 jars of pasta sauce
2 cups of shredded colby jack cheese
1-2lbs of ground beef

Directions:
Brown the ground beef and season to taste (I use salt, pepper, and garlic powder). Add 1 jar of pasta sauce to the ground beef and mix well.
In crockpot, layer ravioli -> ground beef -> pasta sauce -> cheese. Continue layering as needed (I usually get 3 layers in my crockpot).
Cook on high for 4 hours.
I serve it with a side of garlic knots (see image below of the ones we like! Also from Sam’s Club) and ceasar salad.


***SAUSAGE & TATERS***
Ingredients:
3 packs of Sausage Links (I use Hillshire Farm Polska Kielbasa Smoked Beef Sausage Rope)
4-5 potatoes
1 small onion (optional)
1 cup of water or beef broth (I use beef broth)

Directions:
Cut sausage into smaller pieces and dice onion. Dice potatoes and season with salt and pepper. Add all ingredients to crockpot and cook on high for 4-6 hours or low for 8 hours.


***POTATO SOUP***
Ingredients:
1 bag of diced frozen hashbrowns
1 26oz can of cream of chicken soup
1 32oz container of chicken broth
1 8oz block of softened cream cheese
Bacon pieces (for topping)
shredded cheese (for topping)
Shredded chicken (optional- season with salt and pepper)

Directions:
Combine hashbrowns, cream of chicken, broth, and cream cheese in crockpot. Cook on high for 4 hours. Stir well before serving.
Serve topped with bacon pieces and shredded cheese.
This can be served as a side item, or you can top with shredded chicken for a whole meal.


***CHICKEN AND DUMPLINGS***
I must preface this one by saying it feels a bit sacrilegious to be a southerner and make this form of “cheat” chicken and dumplings. However, for a fast meal it’s not bad. And it’s definitely a whole lot less work than the real thing. I wasn’t a huge fan of this recipeΒ  (thanks to my spoiled southern taste buds), but the kids and hubby LOVED it.

Ingredients:
1 can of biscuit dough
1 32oz container of chicken broth
1 26oz can of cream of chicken soup
Shredded chicken (seasoned with salt and pepper)

Directions:
Add broth, cream of chicken, and shredded chicken to the crockpot. Cook on high for 2 hours. Cut the biscuit dough into bite size pieces and add to the crockpot. Cook for an additional 2 hours.


That’s all I’ve got for you for now! If you try any of these recipes, please leave me a comment and let me know what you thought!

Thanks for visiting my blog! See you next time! (Soon, I hope!)

~Heather~

Martin Homeschool

Hey y’all! Our new school year started August 13th. We started out super strong and, I’m happy to say, we haven’t lost too much steam! Obviously, the excitement of week one has worn off for the kids, but mostly they are still putting 100% into their daily work and enjoying it.

So here we are finishing up week 4 and I realized I never did a blog on our school room! If you follow Surviving Seven on facebook, then you probably saw my video tour of our school room, but I wanted to add this blog as well.

Boxed curriculum can cost up to $500 per grade level. I’m teaching four different grade levels… plus, who can buy curriculum online without looking at every piece of it first? I can’t! Not to mention, what if my child is ahead or behind in a certain subject? Boxed curriculum doesn’t allow for that adjustment. I found what works best for us is piecing together my own curriculum with different workbooks and study guides.

41134532_299096847543634_8711008002087321600_n

I have really come to love Spectrum workbooks, especially for Math, Reading, and Language Arts. I design my own lesson plan to go along with it. It does create a lot of independent work, which is great since I have multiple levels to teach each day.

41244040_315179665728256_7351815667978338304_n.jpg

For Bible, we use a family devotional I bought from Christian Book Store online. It’s called “Old Story New: New Testament”. Each story is broken down into weeks, and each week has 5 days of devotionals. Each devotion has you read a passage from the Bible, then it has some commentary and questions to go along with it and encourage discussion. We love it so far!

Our Science book, which we received as a gift, is called “Indescribable: 100 Devotions About God and Science”. It’s basically Bible and Science in one. We love it too! The kids love learning how science connects to the Bible. Sometimes, we do a little extra studying (videos, activities, etc) to go along with the lesson for the day.

I bought these storage containers at Walmart (five for $5). The kids each have their own where they can keep their workbooks, notebooks, pencils, and extras. These containers double as a way to divide up the table space for the kids too.

41238320_2199137937033928_2552564033983086592_n

I chose this particular table for many reasons. First, I’m sure you notice the color right away. I am not a purple freak! Haha! I did, however, do some research on colors and found out that purple is supposed to help promote focus and creativity. So, here we are with a purple table. Second, yes it’s a folding table with folding chairs. I’m not cheap, I just thought it would be nice to be able to put these pieces away during the summer. This creates more space in the room to be used for other things when school is not in session.

I know I have talked about my anchor charts before. I showed you all the ones that are posted on the wall in our room, the ones that everyone benefits from. These particular anchor charts are smaller (on printer paper), and laminated. They are for my 4th grader. She keeps these in her container to use with her math lessons.

41192023_374055309800451_4813206094409105408_n

These lesson planner books are my favorite! I got mine at Joann’s on sale for $4 each, but you can also get them online from the company that makes them, Creative Teaching Press. I have one for each kid, and I use it to keep track of what they do in each subject each day. It works great!

I love our hanging organizer. Right now it’s holding things they need for their animal research project for Science (I will post more about that and their current Social Studies project in another blog). Our white board looks sad, I know. Don’t judge, haha! I plan on buying a new one, just haven’t done it yet. I use it a lot. I use it to post their bi-weekly spelling lists, reminders, goals, and I also use it for teaching. It goes thru a lot on a daily basis.

I think that’s most of it! If anyone wants to see more, be sure to check out my video tour on my page, Surviving Seven, on facebook!

Hope you enjoyed my blog!!!

~~Heather~~
~Proverbs 22:6~

HS Prep

August 13th is the big day! I can’t believe the summer is almost gone. Thankfully, I don’t have to worry too much about squeezing in too many activities between now and then. That’s the perks of homeschooling! Our fun can continue throughout the school year!

I’m officially wrapping up this past school year with evaluations being done next week. This will be the first time I’ve had evaluations done, fingers crossed! I’m fairly confident though that everything will be just fine.

My homeschool prep is in full swing already for next year! We will be following pretty closely to the public school calendar, which makes that portion of planning a little easier on me.

I have been working on some new anchor charts for our classroom. I still have a few to go, but these are the ones I have finished so far. Adjectives, nouns, verbs, digraphs, and capital letters.


I have one child doing FLVS (Florida Virtual School), so academic prep work is not necessary for her. For my other three, I’ve been writing out lesson plans and working out a class schedule. I have purchased a few work books, but have some more to buy. School supplies will be purchased during the tax free holiday (August 3-5, 2018 for Florida).

Student ID’s have been printed, laminated, and attached to a lanyard. I make my kids wear them when we go on field trips. I add my cell number to the backside in case they get lost. You can get your own ID’s (including a teacher ID) from Homeschool Buyer’s Co-Op. It’s free to join and you can either have them professionally printed for a fee, or print at home. As you can see, they include the Co-Op logo, your homeschool name, child’s photo, name, birthdate, ID number, parent’s name, and child’s grade. The teacher ID includes your address and phone number, which is great to use if you are signing up for teacher discounts!
37036474_10215700264555785_7818518449428103168_n

Is Pinterest still popular? I use it all the time! You can see my 2018-2019 homeschool board HERE. I try to update with each new school year. I have it broken down into sub-sections so it’s easier to navigate.

I will keep y’all updated with planning and post photos of the new school room once it’s finished!! Keep checking back! And if you haven’t already, join my group on Facebook Surviving Seven!

~~Heather~~

Reusable Baby Wipes

So here’s something new to me: reusable baby wipes. If my last 2 kids were any indication of how my newest would be, I knew I had to do something to take care of that sensitive baby bottom! My other two always had rash/breakout problems with regular wipes. “Sensitive” or “fragrance free” wipes just don’t cut it. And let’s be honest, wipes cost a fortune! With my last (now 2 years old), I discovered the wonderful world of Honest Company and their amazing wipes that seemed to work well. However, with the decline in quality of their products, I stopped using them (don’t even get me started there!).

So I did what any mom of 2018 would do, I got on Pinterest and started searching index I discovered this interesting “new” (to me) concept of reusable wipes. I did a lot of research on the products you put into the solution for reusable wipes, and came up with my own recipe for the perfect baby booty cleaner!

35328099_10215506778478754_697058696626176000_n

Baby wipe solution:
2 cups filtered water
2 tbsp Aloe juice
2 tbsp Witch hazel
2 tsp Castile soap
8-10 drops Gentle Baby essential oil
(tip: I looked everywhere for liquid castile soap, but no local stores had it. I used the bar soap and a fine cheese grater and added the shavings to the solution. It works just fine!)

35344799_10215506778758761_7620162621882236928_n

After the solution was combined, I stored it in a spray bottle. Anytime I change a diaper, I just spray the cloth with the solution. You can store the cloth in the solution in a container, but from what I’ve researched, the wipes go stale fast if you do it that way. In case you are wondering, the cloths I use are just regular baby washcloths (I bought a 10pack from Walmart for around $5).

35265131_10215506778278749_7817701757101801472_n

I absolutely love the Gentle Baby essential oil! All of the recipes I saw online called forΒ  Lavender oil, which I don’t like the smell of. Gentle Baby is used alone to help treat diaper rashes, so you can imagine the added benefits having it in this solution! Plus, it smells wonderful!
You can learn more about the oil from Young Living and purchase a bottle of your own by following this LINK and typing “Gentle Baby” in the search bar under “Products”.
If you have any questions about the oil or Young Living, head on over to my dealer (LOL!), Babe Goes Oily, on Facebook and ask away!

35382929_10215506779038768_3883179433820946432_n

In the beginning, I just tossed the wipes into the dirty basket and washed normal with the rest of her clothes. I started to notice the stains, UGH! I know it’s clean after a wash, but I didn’t like the look. So I came up with this pre-soak solution and it has eliminated any further stains! I mix a small amount of oxi with warm water and keep it in an air tight container. I leave the container on her changing table, and when I’m done changing the diaper, I just toss the wipe in until it’s ready to be washed.

I am very glad I made the switch to reusable! It help her from getting rashes, smells amazing, and is much more affordable than disposables! I urge you to give it a try!

Thanks for reading! Don’t forget to follow my group on Facebook, Surviving Seven!

~~Heather~~

Freezer Meals Part 2

Here’s part 2 that everyone has been waiting for! If you want more details on my entire freezer meal prep process, please read Freezer Meals Part 1 that was previously posted.

If you’re here for the recipes, then here you go:

~~BBQ Chicken~~
(literally the easiest thing you can make!)
Chicken breasts (cooked and shredded)
BBQ Sauce (your choice, I use Sweet Baby Ray’s Original)

Cook from frozen (oven): 350* for 45-60 minutes
Cook from thawed (oven): 350* for 35-35 minutes
CrockPot thawed: high for 4 hours, or low for 6 hours.
31886620_10215207449835725_2351905627225194496_n


~~Chicken Broccoli Bacon Ranch Casserole~~
Chicken breasts (diced and cooked)
Dry ranch seasoning
1lb bacon (cooked and crumbled)
1lb frozen broccoli
Shredded cheese
1lb bowtie pasta

Cook diced chicken in a skillet with oil and dry ranch seasoning until brown. Mix all ingredients together in pan (except cheese). Top with shredded cheese.

Cook frozen: 375* for 45-60 minutes
Cook thawed: 350* for 30 minutes
31531107_10215207449595719_8008421807105245184_n


~~Tater Tot Casserole~~
16oz frozen tater tots
16oz ground breakfast sausage (I prefer Jimmy Dean)
1lb bacon (cooked and diced)
6 eggs
1 cup milk
2 1/2 cups shredded cheese
Salt and Pepper (to taste)

Brown and drain sausage, add to pan with bacon crumbles. Wisk eggs, milk, salt, and pepper in separate bowl until combined. Add egg mixture to sausage and bacon. Top with a layer of tater tots and shredded cheese.

Cook thawed: 350* for 30 minutes or until heated thru.
31944085_10215207449395714_5794683207618134016_n.jpg

That’s all I’ve got for you guys!!! πŸ™‚ Hope you enjoy! Feel free to ask if you have any questions!!!

Join my Facebook group too, Surviving Seven!

~~Heather~~

Hospital Prep!

I feel super prepared for this baby! I’ve got a hospital bag packed and a birth plan! Whaaat!? I’ve never done either of these things with my other two births! I went to pre-register today at the hospital. It’s getting so close! Only 2 more days!

So, what’s in the bag?

31531794_10215206998784449_2125904740167450624_n

For Me:
– Nursing gowns
– Lactation snacks
– Breast pads (I highly recommend reusable! I got mine HERE and I only paid for shipping! Keep an eye out for promos!)
– Nipple cream (The hospital usually provides some, but I bought a brand that is lanolin free)
– No slip socks
– Hairbrush and other necessities
– Cell phone and charger (for the billions of pics I will be taking!)

For Baby:
– Cute outfits (including what she will wear home)
– Headband
– Socks
– Nursing pillow
– No scratch mittens
– Swaddlers and baby blanket

The hospital provides plenty of diapers and pacifiers for baby, so I won’t waste the room in my bag.

Now, my birth plan! I’ve never done this before, but after 2 c-sections I’ve come to realize there are some things I really want that I want to make sure I don’t miss! I’m not too picky or demanding πŸ™‚

Here it is:

During Delivery:
*Husband remains in room for support during epidural
*Surgical drape lowered while baby is pulled out

After Delivery:
*Husband cuts umbilical cord
*Skin to skin with baby as soon as possible (after cleaning)
*Baby to be breastfed exclusively and as soon as possible (no bottles, pacifiers are okay)
*Mom offered pain medication as it is available
*Blood clot prevention

I think that’s it! I’m ready! Daddy’s ready! Kids are ready!
The big ones will be spending most of the weekend with their grandparents, so pray for them (the grandparents, not the kids lol). I probably won’t post again until we are back home after the small recovery time at the hospital.

Don’t forget to join my Facebook group! Surviving Seven!

~~Heather~~

Lactation Recipes

Our little one will be here in only 5 days! FIVE DAYS! I’m so ready!
Contractions are killer animated-laughing-image-0175 … But seriously … I’m ready!

Sorry it’s taken me a bit to get going on the second part of the freezer meals. I promise I will get them posted soon! In the meantime, I’m going to throw in a few links to lactation snacks, drinks, and breakfasts that I’ve been working on this week!

 
Banana Chocolate Chip Lactation Muffins – I made these in the mini muffin pan (the recipe yielded about 24 muffins) and put most of them in the freezer in a gallon Ziploc. I left out the nuts, and I cooked these for a lot less time than the recipe calls for. They were done after about 15 minutes, so you might want to keep an eye on them in the oven.

 
Chocolate Banana Lactation Smoothie – I peeled, cut, and froze the bananas ahead of time, so that they would be ready to throw into the blender with everything else. While researching the best way to freeze bananas, I read that they will last in the freezer this way for 2-3 months. I also read that you should freeze them flat on parchment paper (or something else non-stick), and then transfer them into Ziploc bag. This way, the bananas do not stick together. I also substituted regular milk for Almond milk in this recipe (healthier, and I like the taste better!). In case you’re wondering, in the picture the bananas look a little over ripe in some areas. This is okay! Bananas will not ripen in the freezer, so you don’t want them to be too fresh to use.


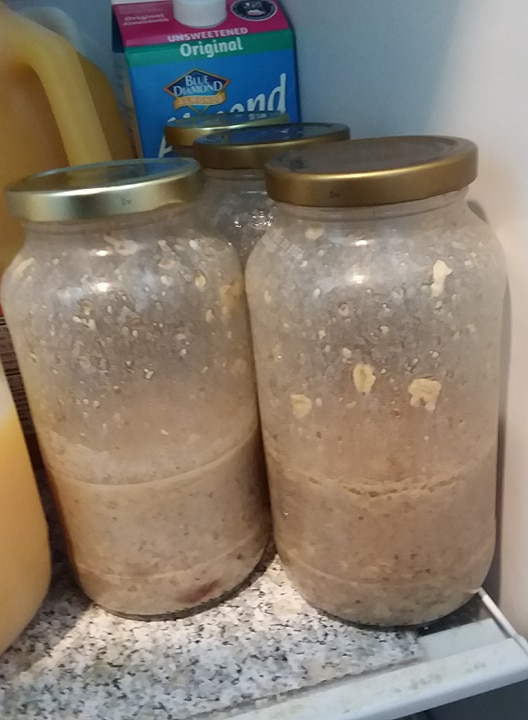
Overnight Lactation Oatmeal – I doctored these up a little to fit my taste (not a fan of plain oatmeal). I added some fruits into each one so that I would have an assortment of flavors. I added dried cherries, fresh baked apples (diced and seasoned with allspice), and diced cinnamon apples. Store these in an airtight container and they should last a week or two in the fridge!
31712203_10215182905102122_6529037862644482048_n.jpg

 
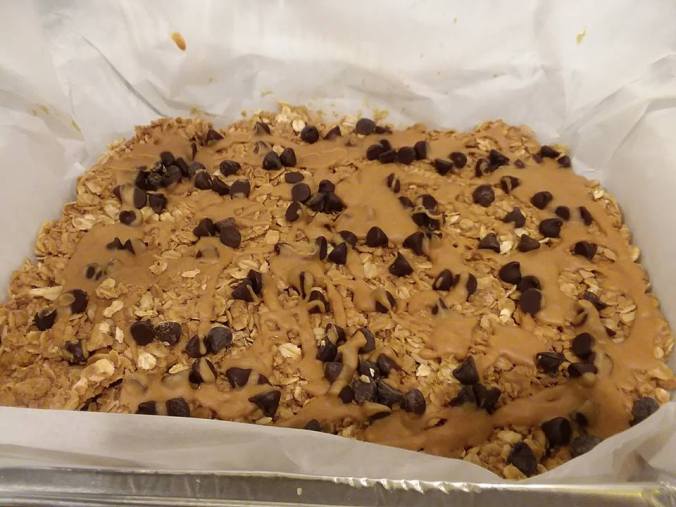
Peanut butter Oatmeal Lactation Bars – This recipe is not specifically for lactation, so I added 1 Tbsp of Flax Seed and 1 Tbsp of Brewer’s Yeast Powder to it. I also drizzled some extra peanut butter/honey mix on top and sprinkled with chocolate chips. I will cut them into bars and store them in the refrigerator in a Ziploc bag. You can leave them stored at room temp in a Ziploc or container if you want them gooey instead of solid.31791432_10215182978543958_8887206509964951552_n.jpg


That’s about all I’ve got for now! Keep checking back for the Part 2 of Freezer Meals!

Join my Facebook group as well at Surviving Seven!

~~Heather~~
~Proverbs 22:6~

Freezer Meals Part 1

We are less than 2 weeks away from baby time! Our newest is scheduled to be here on May 6th. So you know what that means, these last few weeks I have been/will be crunching with all the last minute to-do’s that I’ve been avoiding πŸ™‚

If you follow my Facebook group, you know that I’ve been working hard on freezer meals over the last week. Freezer meals are a life saver! They are convenient, no matter what, but especially when you have a new baby. I made up a bunch of freezer meals when my last one was born, and it ended up being even more amazing than I had originally planned. They ended up keeping him in the hospital for over a week, and of course I stayed with him. If I hadn’t had all the freezer meals ready to go, my hubby probably would’ve ended up feeding my kids McDonald’s and pizza for that week.

This time around, I’m not anticipating needing the meals for this reason, but I am looking forward to not cooking, not stressing over what to make, and being able to have something the hubby can throw in if I’m too tired.

I know the only reason you all are reading this, is to see the recipes! But let’s start at the beginning, shall we?

1. SHOPPING!
I spent a good 2 or 3 days making up a meal list before I did my shopping for the freezer meals. Hours were spent perusing Pinterest looking for new, freezer friendly recipes. It really doesn’t have to take that long, I just really wanted to update all my freezer meal recipes! As you can see here, a lot of my recipes use noodles and sauces. Make your freezer meal list, complete with all of your ingredients before you shop. Make sure you plan accordingly if you need to double recipes (like I have to do!). Once I had my complete grocery list made out, I put in my orders online thru Sam’s Club and Walmart Grocery Pickup and voila! Simple as that πŸ™‚
shopping

2. STORAGE!
It’s necessary to stock up on storage for your freezer meals! I bought these pans and lids (sold separately) from Sam’s Club for about $15 (for 36 pans and lids). I buy the disposable pans when I’m planning to freeze oven meals, but if you plan on freezing Instant Pot or Crockpot meals, you can use gallon size Ziploc bags for storage.

storage1

3. LABELING!
I take a sharpie and write out what meal it is, what temp and time to cook it at, as well as add if it needs to be paired with a side (like bread). Some stuff works if you put it directly from frozen to the oven, some doesn’t. So I always make sure my label includes instructions on whether it can be cooked frozen, needs to be thawed, or both.
labelingstorage

That’s the basics of my prep work! Not too bad, right? Now what you have all been waiting for….the recipes! πŸ™‚

~~TUSCAN CHICKEN PASTA~~
16oz bowtie pasta
4Tbps butter
4 garlic cloves (minced)
1/2Tbps dried basil
8oz cream cheese (softened)
8oz sun-dried tomatoes
2cups milk
8oz grated Parmesan cheese
1/2tsp black pepper
1/2tsp salt
1 chicken breast (diced)

In a medium pot or skillet, melt the butter over medium heat. Add the garlic and cook for about 2 minutes, stirring the whole time. Stir in the dried basil. Add the cream cheese, stirring with a whisk until the mixture is smooth. It will look curdled at first, but with constant whisking for 2-3 minutes, it will become a smooth creamy paste. Stir in the sun-dried tomatoes. Keep cooking over medium heat and add the milk and whisk quickly and constantly until it is blended into the sauce. Stir in the Parmesan cheese, pepper and salt. Cook over medium heat, stirring until the cheese is melted and the sauce is the desired consistency, 5-10 minutes. Fully cook pasta noodles and drain. Fully cook chicken in skillet (I season the chicken with salt and pepper only). Add everything into a 9×13 pan. Once cooled, cover and freeze.

To cook when frozen: Bake at 350 degrees for 45-60 minutes or until heated through
To cook when thawed: Bake at 350 degrees for 30 minutes or until heated through.


~~CHILI & CORNBREAD~~
24oz can tomato sauce
24oz can petite diced tomatoes
1 packet chili seasoning (I use McCormick Original or Chili-O)
12oz chili beans (do not drain)
2lbs ground beef

Brown ground beef in a pot and drain grease. Add back into pot, and add the remaining ingredients. Stir together and simmer on low for 10-15 minutes. Transfer Chili into disposable pan, cover, and freeze.
To cook from frozen: Bake at 350 for 35-45 minutes.
To cook from thawed: Bake at 350 for 20-30 minutes.

For the cornbread, you can buy boxed mix and make corn muffins, or do like I did this time and buy pre-made cornbread from the store. Transfer the bread into a gallon Ziploc and freeze.
Thaw cornbread and cook at 350 until warm (about 10-15 minutes).


~~Apple Raisin Oatmeal~~
**This recipe makes 4 9×13 pans of oatmeal bake!**
10 cups old fashioned oats
3 cups sugar
1 Tbsp All Spice
2 tsp salt
2 Tbsp Vanilla extract
4 small diced apples (you can peel or not, depending on preference)
2 cups raisins (or other dried fruit. I used dried cherries as well)
8 eggs
1 cup melted butter (melted)
10 cups milk

Mix all dry ingredients together in a large bowl. In a separate bowl, mix together vanilla, apples, raisins, eggs, butter, and milk. Once both bowls are thoroughly combined, mix the dry ingredients into the wet ingredients.

Divide mixture among 4 9×13 pans and bake at 350 for 30 minutes. Cool, cover, and freeze.
To cook from thawed: Bake at 350 for 20-30 minutes.


~~SALSA CHICKEN~~
3 chicken breasts
8oz cream cheese
1 small jar of salsa (whatever you like)
8oz black beans
8oz corn
Taco seasoning

Season chicken with taco seasoning, cook and shred. (I put mine in the crockpot for 6 hours on high, then shred it). Mix all ingredients together in pan and freeze. Serve over rice or on tortillas.

To cook from thawed: Bake at 350 for 30 minutes.

29497597_10214885897357114_6023831733506038548_n


Here are some links to other recipes I’ve made so far:

Chicken & Bean Taquitos
Baked Ziti

I hope you all enjoy! Check back for more freezer meal recipes coming up this week!

~~Heather~~

Blog? What Blog?

I haven’t blogged since September… whaaaaaat! Oops!

How about I pick up with some Homeschooling stuff? Yay!

I’m a member of a homeschooling Christian mama group on Facebook, and I’m always seeing people post asking why we all chose to homeschool. Loaded question! Made me think a little… Next year I will have 4 kids homeschooled, and my hubby and I have a different reason for each one.

Here’s the simple breakdown:
* 10yo daughter: She was held back in public school this year due to learning issues. The good news? Retaining her (with extra help) has helped her catch up! Yay! Problem solved! So why homeschool? Honestly? No reason other than she found out all of her siblings were going to be homeschooled next year and she didn’t want to be left out…
Hey, I’ll take it!
index

*8yo son: He has been diagnosed with an Intellectual Disability (ID for short). In public school (before the current school year), he was in “2nd grade ESE”. Academically, however, he is only on a Pre-Kindergarten/Kindergarten level in every subject. The public schools covered this delay with an IEP that set extremely low goals for him to accomplish each year in order to pass. His last year in public school, I was told by his teacher that he would sit in his desk and refuse to participate in any class work/activities pretty much all day, every day. But hey, he accomplished his IEP goal of “Identify 5 of 26 letters in the alphabet” and “Count to 5” so… he passes the entire grade!…? Let’s add this to the fact that he was being bullied and abused at school (by his teacher), and you can see why this year, he’s home with me… actually learning!

*7yo daughter: Lord help me here. I could write a never ending blog on the hardships of parenting this one… but I won’t. She’s our wild child, the one that tests every limit set in every aspect of life just to see where your breaking point is. She has been involved in counseling for the last 2 years to try and fix her behavior issues (which are too many to list here), but to no avail. She’s currently failing 1st grade, but let’s be honest here, with the standards of our public school system, she’s basically failing Kindergarten level material. And her teacher’s methods of teaching are severely lacking for this kids specific issues. She has been diagnosed with ADHD (don’t get me started on this, I don’t agree with it… not the place to get into it in this blog!) and is currently on medication that has been increased several times over the last few months, yet still doesn’t help one little lick!
Let’s be honest, she has an insane lack of self control, blatant disregard for rules, and non-existent self responsibility. Her school’s staff is obviously not equipped to handle a child like her, and it’s causing some severe safety concerns throughout this year (for both her and other students). Therefore, she will be home with me, under a more watchful and disciplinary eye.

*5yo daughter: Her birthday misses the public school cutoff to start Kindergarten by 1 day… ONE DAY! Therefore, without homeschool, she would have been held back an additional year, and would be 6 years old before she was finally able to start school. Thankfully, I don’t have a terrible public school experience to pair with her, and I intend to keep it that way!

So there’s all of my “why’s”! And my 2 youngest (2yo son and daughter due in May) will be homeschooled just because that’s how we roll now! animated-laughing-image-0175

office

I promise I will keep up with posting over the next couple of months! I’ve got an awesome Summer project planned for the kids (details to come!) and I’ll be purchasing next year’s school curriculum later this month! I will definitely be sharing with you all! Thanks for reading πŸ™‚

~~Heather~~
Psalm 127:3

Just another Cat 2 – Irma Prep

Hello from Sunny Florida! (At least for the next 24 hours-ish)

We are busy preparing for Hurricane Irma! Yay… <– Sarcasm πŸ™‚

It’s expected to be a category 2, and come right up the middle of Florida… right over us (Orlando). We are not panicking, but taking it seriously. Since, you know, Irma is bigger than the state of Florida at the moment….
21432955_1702714819747913_2752789420742081543_n
(Image: Brian Shields, WFTV Weather Facebook page)

So, we have NOT boarded up windows, or hoarded sand bags, but we have done the usual prep. We have plenty of water (for drinkin, bathin, and flushin), a generator to run our fridge and freezer, a grill with extra propane (for cookin), candles and flashlights, plenty of frozen chicken, frozen bread, emergency cash, evacuation bags, and tanks full of gas.

… that’s about it πŸ™‚

I thought I’d share some of the bread maker recipes I’ve been cookin up the last few days. If you missed my hurricane prep video on Facebook, then you might not know that all stores are wiped clean (and have been for days) of water and bread. I love my bread maker because at times like this we don’t have to panic, I’ve got plenty of bread goodies made up to last us until electric and order is restored πŸ™‚

21314442_10213222862182274_7311124886879959289_n

Remember: these recipes are for a Bread Machine! And they are all freezer friendly!

Old Fashioned White Bread (2lb loaf)
1 1/2 cups + 2 tbsp Milk
2 tbsp Butter
4 cups Bread Flour
2 tbsp Sugar
1 1/2 tsp Salt
2 tsp Bread Machine Yeast

Cinnamon Rolls
1 cup water
2 tbsp Butter
1 Egg
3 1/3 cup Bread Flour
1/4 cup Sugar
1 tsp salt
3 tsp Bread Machine Yeast
(This is a dough only!)
Filling:
1/3 cup Sugar
2 tsp Cinnamon
2 tbsp Butter
Glaze:
Powdered Sugar
Milk
Vanilla Extract (optional)
Chopped Pecans (optional)
Roll out dough into a thin layer, spread butter and sugar mixture onto dough. Roll the dough into a log shape and cut into 1- 1 1/2 inch rolls. Place into greased pan and cover.
Allow the Rolls to rise for 30 minutes, then bake at 350* for 20 minutes. Top with glaze fresh out of the oven.

Garlic Parmesan Breadsticks
1 1/2 cups water
1 tbsp Yeast
1 tbsp Sugar
1/2 tsp Salt
4 cups Flour (all purpose)
(This is a dough only!)
Roll out each piece of dough into a long rope then twist. Place dough twist onto prepared baking sheet and repeat with the rest of dough, placing side by side on baking sheet.
Cover and let rest 30 minutes to rise until doubled.
Preheat oven to 425Β° F. Bake 10 to 12 minutes or until golden-brown. Remove from oven and rub a 1/2 stick of butter over the warm breadsticks. Sprinkle tops evenly with Garlic powder and Parmesan cheese!

So there it is! Basically, I made a whole bunch of each thing (still working on the breadsticks, so no pic, sorry) and stored it all in pans and ziplocs in the freezer until needed πŸ™‚

21442903_10213237279822706_1288872933_n21443042_10213237280142714_189832003_n

Please make sure you follow my Facebook group for more from Surviving Seven!

~~Heather~~
~Isaiah 41:10~